Guide · Context Blog
How to set up and automate your blog
Two MCP connections and one sentence. Your agent interviews you, charts a map in Context, drafts on a schedule, and nothing goes live until you approve it in Context. Section 1 is the whole loop end to end in plain English, with a real blog as the example — read that one first. The rest is the reference: connect, start, interview, what gets created, drafts and approvals, routines, domain, tracking, re-running, and what to check when something looks off.
blog-agent skill · this guide on Context Blog · markdown
1 Start here — the whole thing, once, in plain English
If you read one section, read this one. It is the entire loop end to end, with a real blog as the example, and no commands to learn beyond a single sentence. The sections after it are the reference: same steps, more detail, every edge case. Nothing you set up here publishes anything on its own — a person approves every post.
The example is getmeetly.ai/blog, which runs this way. Be exact about what that shows: its back catalogue — 118 published posts across 7 languages — was imported when the tenant was created, and Context Blog serves every one of them on Meetly's own domain. Everything written after that import goes through the steps below.
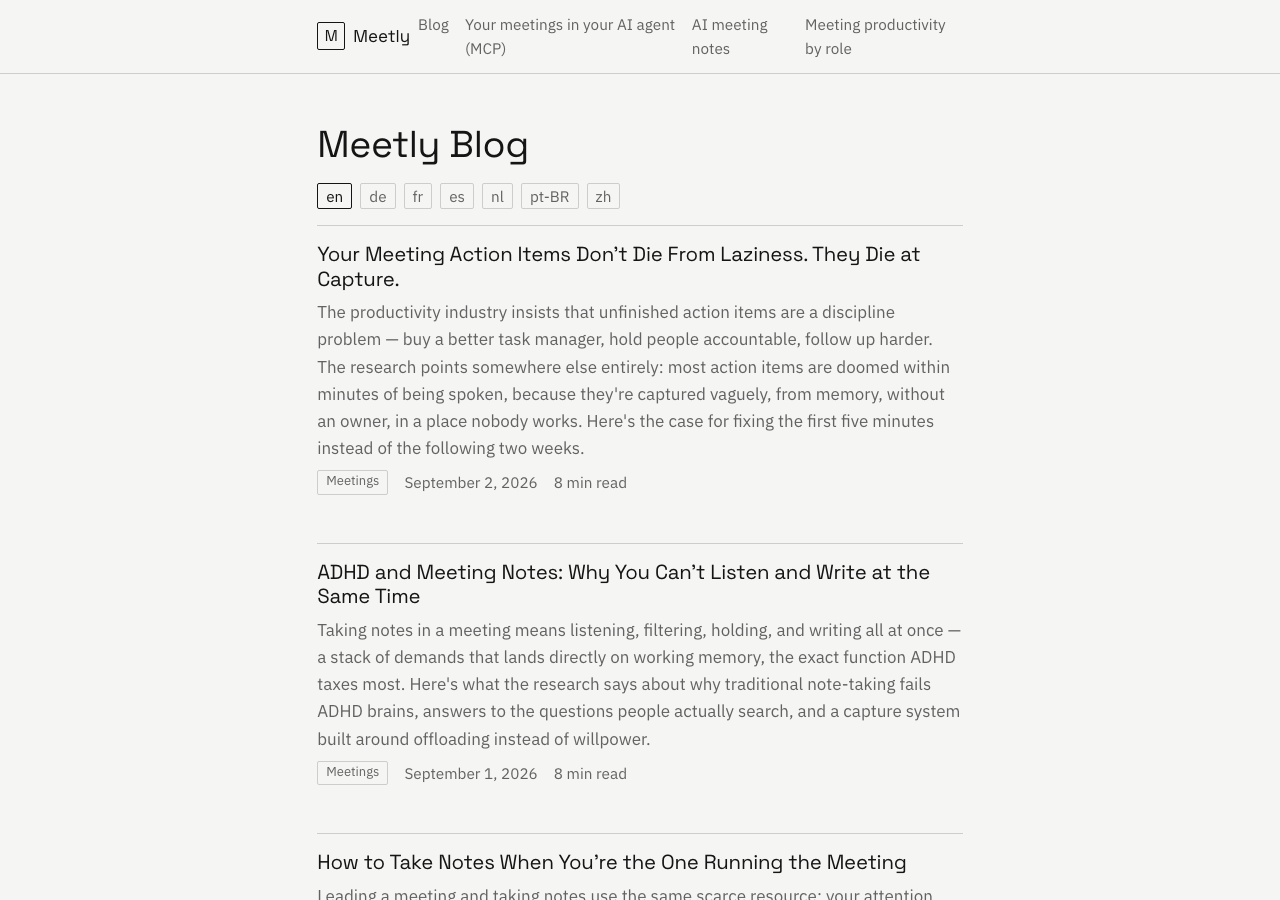
The blog lives on the customer's own domain, served by Context Blog behind a proxy. The language tabs are generated from the plan, not hand-built.
1. Connect two things, once
An MCP connection lets the assistant you already use read and write inside another product. You add two and never think about them again: Context, which holds the plan and your approvals, and Context Blog, which holds the writing and does the publishing.
In Claude Code that is two lines in a terminal:
claude mcp add --transport http context https://mcp.onecontext.me/mcp
claude mcp add --transport http context-blog https://sites.onecontext.me/api/mcp
On the web there is no terminal: in Claude open Settings → Connectors → Add custom connector, and paste the same two addresses (ChatGPT has the same thing under a different label). Connecting Context signs you in with Google, or lets you pair your iPhone for Private Spaces — either way it's the same Context Account, so your maps and approvals show up wherever you look next. No key to copy, no key to lose.
2. Say one sentence
There is no command to learn. Type this to your assistant exactly as written and it finds the right tool itself:
Call the Context Blog tool setup with workflow 'blog' and follow its nextStep.
What comes back is instructions your assistant reads, not something you have to. It installs the writing playbooks, checks whether you already have a blog, and then does the one thing it cannot do without you: it starts asking questions.
3. Answer the interview
This is the part that decides whether the blog is any good, and the only part that needs real attention. Answer in plain sentences, the way you would brief a new writer on their first day. Everything the routines do later comes from what you say here.
- Who is talking. Your voice: the words you use, the words you refuse to use, whether you say "we" or "I".
- Who you are writing for. Real groups of people, what worries them, what they type into a search box at 11pm.
- What you will never claim. The sentences that must never appear, even if they would sell.
- How often. Two a week, three a week, which days, which languages.
- Where it publishes. Your own domain, or a page we host for you.
Detail matters more than length. Meetly's answer to the first question was: "the friend at the table who is genuinely curious about what everyone just said — plain words, concrete scenes, real outputs, never a pitch." Its answer to the third listed what it must never claim: HIPAA compliance, legal or medical advice, invented numbers, real user meetings as examples. Its answer to the fourth stopped being a sentence and became a setting: three slots a week, Monday/Wednesday/Friday at 22:00 Singapore time, English as the master.
One thing to know before you answer: any keys you mention stay on your machine. The assistant refers to them by name only and reads the value from wherever you already keep your secrets. Context Blog never stores them and never sees them.
4. Look at the plan
Within a few minutes the plan exists somewhere you can look at it — not a chat log you will lose, but an epic in Context with a lane per kind of work, plus the documents the interview produced. Read it once and correct anything that sounds wrong.
- Lanes. Blog, Instagram, Backlog, Daily Brief, Health and Performance. Each post is one ticket, with its slot and status.
- Two documents. Your brand voice and your audiences, written out and attached to the epic. These are what the writer reads before every post.
- Your first topics, each tied to a question people actually search for.
5. Approve the first post
Now the loop runs once. Four things happen before the post reaches you, because nobody should be asked to trust a first draft:
- A draft, written against your brand document with sources cited inline.
- Automatic checks — banned phrases, broken markup, missing sources, the structure the format needs.
- An independent checker — a separate run with no memory of writing the piece, which verifies every link and number and can send the work back.
- A preview — the post in your fonts and colours, at a link you can open on any device.
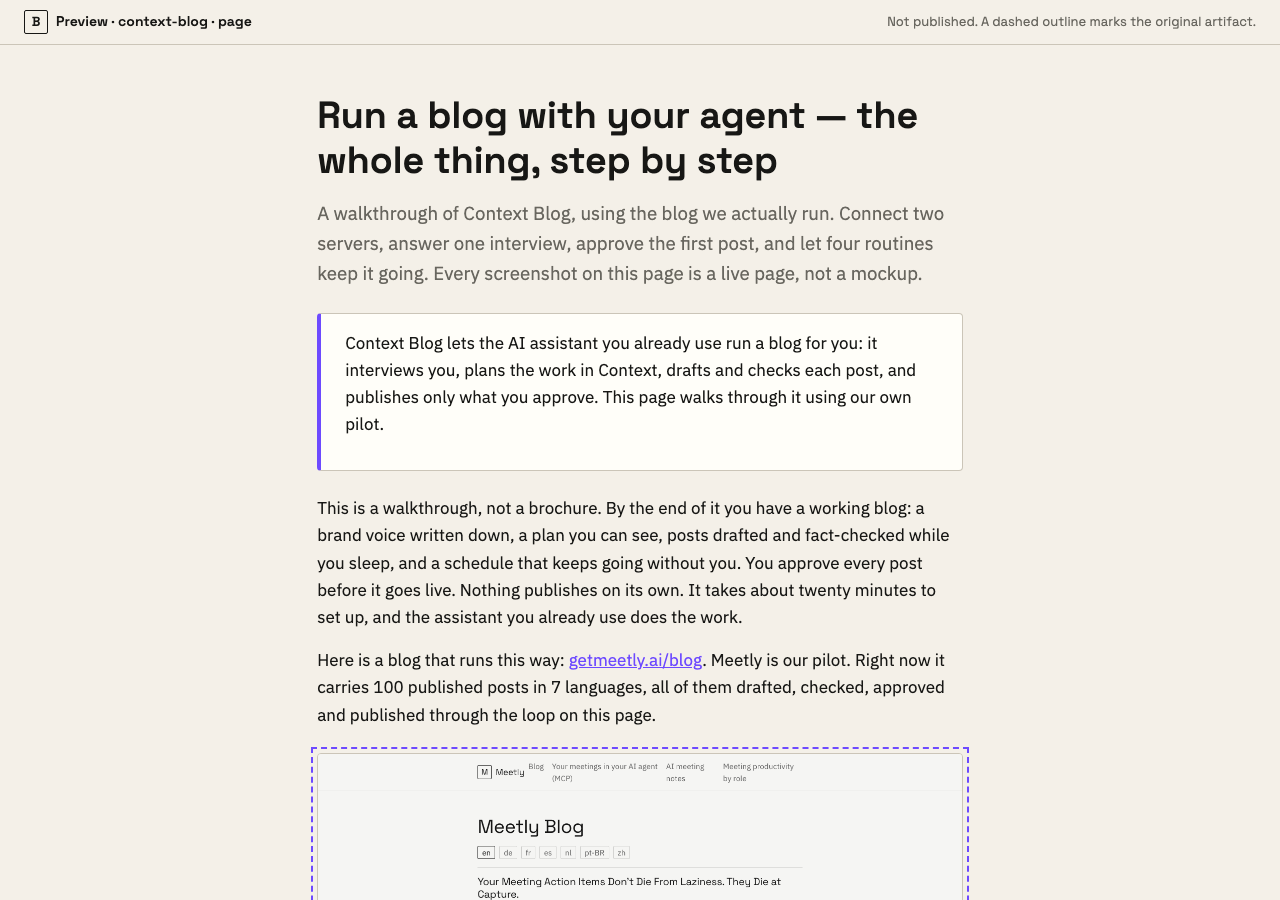
What an approval looks like from your side. The bar at the top says it is not published yet. This is the last thing you see before you say yes.
Then the ticket in Context asks you a yes-or-no question. Only a person can answer it.
6. It goes live
You approve, and the post lands at your own address — yourdomain.com/blog/the-slug, on your domain, in your fonts. The technical files search engines and AI assistants need are generated and kept current on every publish: a sitemap and RSS feed, a social preview image per post, structured data, an IndexNow ping so search engines hear about it in seconds, and language versions cross-linked so your German post does not compete with your English one.
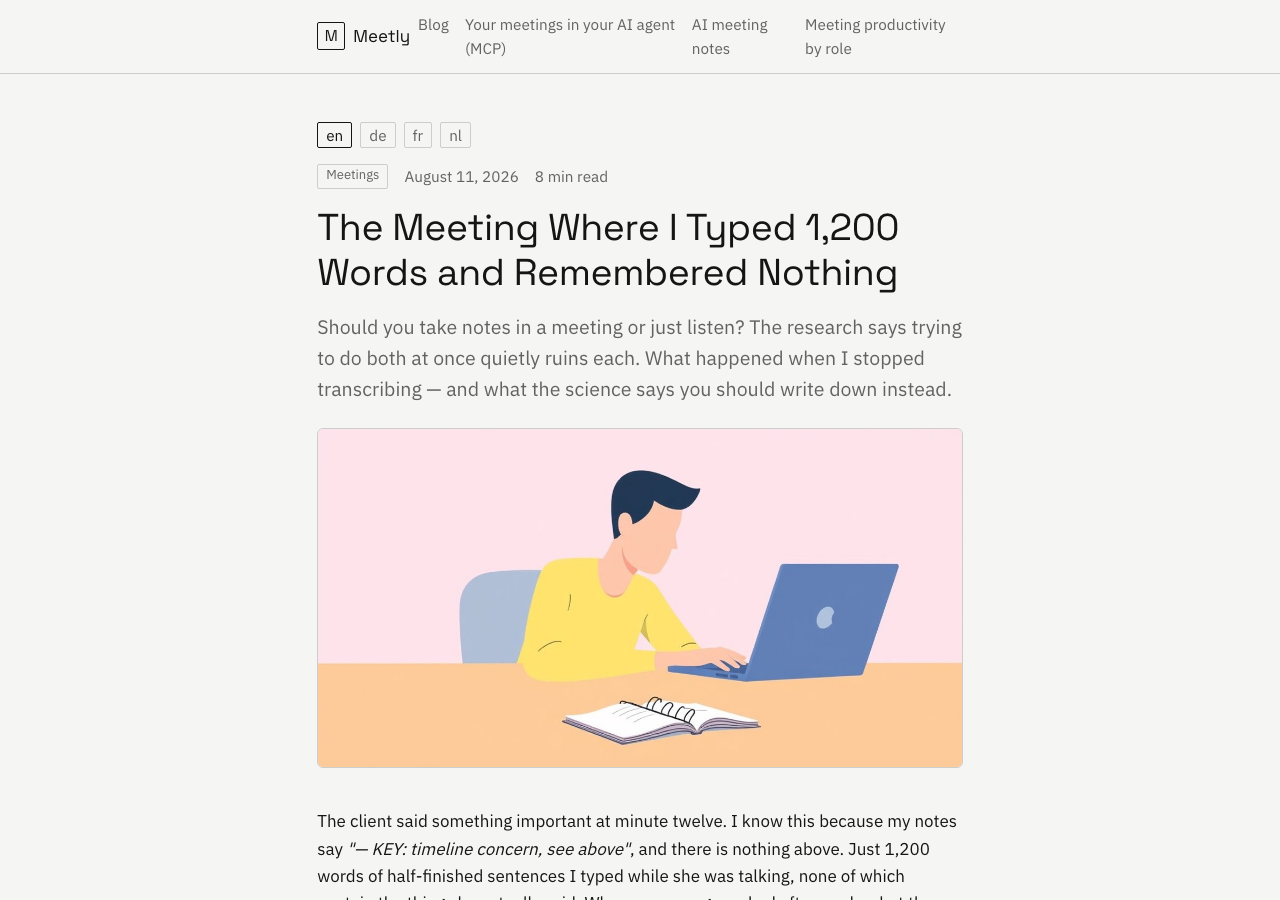
A real post, live. The language switcher, reading time and subject navigation are all generated from the plan — nobody typed them.
Connecting your own domain is a settings page, not a project: enter the address, choose whether to point DNS at us or route it through the site you already have, and the page tells you the exact record to add. Meetly runs the second way, under an existing marketing site at /blog. Section 9 has the detail.
7. Set the rhythm
One post is a demo; four small jobs on a clock are what keep it going in month four. The same setup run installs them — as job files on your machine if you work in a terminal, or as four ready-filled prompts you paste into your assistant's scheduled tasks if you do not.
- A brief, every morning at 08:00. What was written, what is waiting for you, what went live, what broke.
- A writer, at 02:00 every night. Keeps finished drafts ahead of the schedule so a bad night never means an empty slot.
- A publisher, every three hours. Looks for posts you approved whose slot has arrived, and puts them live.
- A review, every Monday. Reads the week's numbers and tells you what to write more of.
No drafting or publishing agent runs on our servers, so nothing keeps writing in your name after you stop paying attention. Treat the morning brief as the alarm: if it stops arriving, something is wrong. It is one message a day, and its absence is the only monitoring you need.
That is the whole loop
Connect, say the sentence, answer the interview, read the plan, approve the first post, set the rhythm. Everything below is the same thing with the details filled in — start at section 2 when you are ready to do it for real.
2 Connect
Connect Context — one endpoint, one sentence: https://mcp.onecontext.me/mcp. Sign in with Google, or pair your iPhone for Private Spaces; either way it's the same Context Account, one Shared Space. (Full walkthrough: Connect Context to your AI.) Then connect Context Blog.
claude mcp add --transport http context https://mcp.onecontext.me/mcp
claude mcp add --transport http context-blog https://sites.onecontext.me/api/mcp
ChatGPT: Settings → Connectors → Add, paste the URL, sign in with Google or approve on your iPhone when asked. claude.ai: Settings → Connectors → Add custom connector, same URL. Both hosts get a links set-up (skills read from the public hub) instead of files.
Set up a blog. 1) Connect Context —
https://mcp.onecontext.me/mcp(sign in with Google; pair your iPhone for Private Spaces). 2) Connect Context Blog —https://sites.onecontext.me/api/mcp(Google sign-in; no key needed for interactive hosts). Claude Code:claude mcp add --transport http context https://mcp.onecontext.me/mcpandclaude mcp add --transport http context-blog https://sites.onecontext.me/api/mcp. 3) Say: Call the Context Blog toolsetupwith workflow 'blog' and follow its nextStep. Your agent interviews you (brand, audience, hubs, cadence, channels, keys by name), charts a Meetly-style epic in Context (Blog / Instagram / Backlog / Daily Brief / Health / Performance), writes the tenant to the platform, and hands you the routine templates for your machine. If the epic already exists, setup says so and reuses it; sayredoto re-run the interview and refresh the brand guides. Every draft waits for your approval in Context before it goes live.
Context Blog signs you in with Google the first time an interactive host connects — no key needed. A key (a Blog Access Key, minted at https://sites.onecontext.me/keys) is only for routines that cannot open a browser (a Mac mini cron, a CI step); store it under a name such as BLOG_ACCESS_KEY and only ever refer to it by that name.
3 Say the starter prompt
With both connections in place, say exactly this in the chat:
Call the Context Blog tool `setup` with workflow 'blog' and follow its nextStep.
That one call resolves the blog-agent skill and its dependencies (rules-blog, rules, setup-context, wayfinder, grill-me, daily-brief, blog-drafter, blog-checker, blog-publisher, blog-assessment, plus instagram-drafter, instagram-publisher and site-builder for the other channels) from the public skills hub and returns a nextStep your agent follows verbatim. Coding hosts (Claude Code, Codex, Cursor) get the skills written as files; chat hosts (ChatGPT, claude.ai) get links plus the inlined protocol. Nothing is drafted or published by this step — it only starts the interview.
The same sentence works for a site (workflow 'site') or Instagram (workflow 'instagram'); the interview's first question lets you combine them. Skill sources: https://agents.onecontext.me/skills/blog-agent.
4 What you get by tier
The interview's third fork is the output tier. Decide it before you answer — it sets what the platform does for you and what stays on your side:
- Artifact — every draft and its checker report land as documents on the issue in your epic; you publish yourself, anywhere (your CMS, Substack, a static site). Performance comes as the weekly report posted on the epic's Performance Report issue. The platform keeps only a tenant record (tier
artifact) so the checker can lint, render the preview and keep the verdict trail — nothing is published; no keys beyondOPENROUTER_API_KEYfor headless drafting. - Review & self-publish — the same, plus a rendered preview of each draft with your design tokens (a signed URL, valid 7 days), the standing lanes and schedule, and the checker gate before anything reaches you. You still publish yourself.
- Hosted — published on
sites.onecontext.meor at your own domain (section 8), with sitemap, RSS and Open Graph handled automatically on every publish — and IndexNow too once the tenant has its own hostname (section 8); on the default platform address IndexNow is skipped and says so; Umami analytics; the analytics dashboard athttps://sites.onecontext.me/tenants/<slug>/analytics; and the weekly AI-visibility probe (section 9). Routines needBLOG_ACCESS_KEYby name.
Whatever the tier, you can ask your agent for the numbers at any time — it calls stats_summary, top_posts, visibility_report, search_queries, tracking_setup_status on the Context Blog MCP and reports back; sources that are not configured are named, never guessed. You can move up a tier later by re-running setup (section 10).
5 The interview
Your agent opens with a short statement of what it does and three forks with a recommendation each — what (blog · site · Instagram), how often (once · recurring), output tier (Artifact: documents in Context and you publish · Review & self-publish: plus lanes, schedule and the checker · Hosted: plus publishing at your domain on Context sites, analytics and AI visibility). Then it asks in numbered rounds (❓ Q1 … with a ➡️ recommendation each) and waits for real answers; a round covers the whole frontier, and it stops only when nothing is silently assumed:
- Round 1 — product & inputs: brand and product in one line, site URLs, 3–5 pieces of your own writing for tone, competitors, what "done" looks like, locales and markets, what is off-limits.
- Fact-finding (the agent, not you): it reads your site for palette, fonts and logo, your writing for voice, and competitors for formats — and reports back in a few lines with sources.
- Round 2 — brand ambassador: voice adjectives and anti-adjectives, claims you never make, a sample paragraph for approval, byline (a named person or the organisation), proposed design tokens.
- Round 3 — audience & topics: persona tiers, 4–6 hubs with a pillar each, the first 10 topics, ~30 target queries, cadence per channel, slots and timezone.
- Round 4 — operations: which routines this host installs and when, the model choices, extra gates, and — Hosted only — the domain shape, GA4, Search Console.
Keys are asked for by NAME only. The agent asks which names you have (OPENROUTER_API_KEY for drafting headlessly, BLOG_ACCESS_KEY for hosted routines, POSTIZ_API_KEY for Instagram, GA4_MEASUREMENT_ID if you bring your own analytics) and where you keep them. If a value ever appears in chat the agent refuses to store, echo or use it and asks you to put it in your secret store. Nothing you type in the interview is stored on the Context Blog platform except what you approve: the brand guide, the audience & hubs document, the design tokens, the decision record and the brief — all attached to your epic in Context, and (Hosted tier) the tenant, brand and hubs written through the Blog MCP.
6 What gets created
When the frontier is empty the agent charts, in this order, and then raises one combined map + spec review for you:
- One epic in Context —
<Brand> Blog(labelstenant:<slug>,wayfinder:map) — with five documents attached: brand persona, audience & hubs, design tokens, decision record, Context brief. - The standing issues as children of the epic,
Daily Brieffirst: Daily Brief · one parent per channel you chose — Blog, Instagram, Site — · Backlog · AEO/SEO Health · Performance Report. (Blog / Instagram / Backlog / Daily Brief / Health / Performance in the map.) Every piece of a channel is a child of its channel parent; the Backlog holds ideas and researched topics. - The first publish issues — one per piece × channel × locale from the first ten topics, each a child of its channel parent with a
dueslot andgate:artifact, locale variants linked to their English master. Only the first cycle (≤ 2 weeks) is charted; the Backlog holds the rest. - Hosted tier only — the tenant on the platform:
tenant_create→brand_upsert→hubs_upsert→topics_upsert→domain_connect, each result posted on the epic. From then on every draft has a preview URL (a self-contained render with your design tokens, signed, valid 7 days) so you review the actual page, not a text file. - Routines on your machine (section 7) and a handoff comment addressed to the next agent.
Approve the map and the spec together on the review ticket. Until then nothing runs; after that the routines take over.
7 Drafts → checker → your approval → live
Every publish issue goes through the same loop, and the agent that drafts is never the one that checks:
- Draft — the nightly
blog-drafterroutine takes the earliestbacklogpublish issue and writes it against the brand guide and the playbook (answer-first, H2 leads, FAQ, citations, an original artifact). - Check — a separate
blog-checkercall runs the machine checks (content_lint), renders the preview (preview_render), does the judgement checks and the fact-check, and records a verdict (pass · bounce · escalate) on the audit trail (check_record). A bounce goes back to the drafter; you only see pieces that passed or were escalated. - Your approval — draft, verdict, preview URL and the models used are attached to the issue and a
reviewRequestis raised in Context. You approve (→done) or request changes (→ back tostartedwith your note). No draft goes live without this. - Live — the
blog-publisherroutine runs every 3 hours and publishes exactly the approved pieces whose slot has arrived. The publisher window is[due, due + 3 h): an issue is published at itsduetime, never earlier, and if the machine was off and the window passed it is re-slotted to the next slot with aMissed windowcomment — nothing is published late without saying so. Hosted tier: the live URL lands on the issue, IndexNow is pinged when the tenant has its own hostname, locale variants cascade. Artifact tier: the approved document is the deliverable and you publish it yourself.
publish refuses without the issue's id and an explicit assert_context_done. That assertion is the publishing agent's, recorded together with the issue id on the audit trail: the platform does not re-read your Context, so what it guarantees is that every publish is attributable to a named issue — the approval itself is enforced by the publisher, which asserts only after reading the issue as done.
Your first approved piece, end to end. Approve the map (section 4). The drafter takes the earliest publish issue at its next run — or, to see the loop now, tell your agent: draft the first publish issue now and run the checker. You get one review request in Context with the draft, the verdict and (Review & self-publish / Hosted) the preview link; open it, read, approve. On the Artifact tier the approved document is your deliverable — publish it where you like. On the Hosted tier the publisher takes it at its due slot and posts the live URL on the issue; the next daily brief lists it under Published. That is the whole loop; every later piece runs the same way without you starting it.
8 Routines on your machine
Context has no scheduler by design — the loop runs on the host that owns the workflow (your Mac, a Mac mini, a server, or scheduled prompts in ChatGPT / claude.ai). The agent installs them in this order and verifies each install (launchctl list, crontab -l, or the host's task list) before claiming it:
- Daily brief — first, always, 08:00 in your timezone. It is the dead-man's switch: one comment a day on the Daily Brief issue with what was published, what awaits you, what failed, what is next and whether each routine ran. If the brief does not appear, the loop is down — there is no server-side monitor, on purpose.
- Drafter — nightly (
blog-drafter+blog-checker). - Publisher — every 3 hours (
blog-publisher). - Assessment — weekly (
blog-assessment, section 9).
Templates ship inside the skill: routines/launchd.plist.template (macOS), routines/crontab.txt (Linux) and routines/chat-routines.md (the scheduled-prompt texts for ChatGPT / claude.ai) — all at https://agents.onecontext.me/skills/blog-agent. Headless routines authenticate to Context Blog with BLOG_ACCESS_KEY and draft with OPENROUTER_API_KEY, by name. On the Artifact tier or for a one-off, nothing is installed and the agent says so.
What the daily brief looks like:
Daily brief — <YYYY-MM-DD> (<timezone>)

Published (24h): <n> — <title> → <link> · …  (or "none")
Awaiting approval: <n> — <title> (<waited>) · …  (or "none")
Failed / skipped: <n> — <what and why>  (or "none")
Next (24h): <drafts due> · <publish slots> · <reports>; buffer <ready>/<slots>
Routine health: daily-brief ok · drafter ok <last run> · publisher ok <last run> · assessment <last run>
9 Custom domain (Hosted tier)
Three shapes, chosen in Round 4: proxy (yourdomain.com/blog — your site forwards /blog to Context sites), CNAME (blog.yourdomain.com pointing at the platform), or the default platform address (https://sites.onecontext.me/t/<slug>/blog, no DNS at all — with sitemap.xml, rss.xml, robots.txt and _health under that path).
domain_connect returns the exact DNS record or proxy rule to add, as a checklist; domain_status reports the verification state once you have added it. Until the domain verifies, the platform address keeps serving the site, so nothing is blocked on DNS.
The same settings — hostname, shape, verification, the tracking ids below — are on the tenant's settings page, https://sites.onecontext.me/tenants/
10 Tracking & performance
What is measured depends on the output tier, and nothing is ever invented — a source that is not configured comes back as zero with its name in not_configured:
- Artifact / Review & self-publish — you publish, so traffic is measured wherever you host. The weekly assessment still runs from your machine (the AI-visibility probe below) and its findings land in Context.
- Hosted — page and referrer stats from Umami (privacy-friendly, no cookies; the platform's own instance, or your own
umami_website_id), IndexNow submission on every publish once the tenant has its own hostname (section 8) so new URLs are indexed quickly — on the default platform address it is skipped andindexing_statusnames the reason, and Google Search Console queries and clicks if you grant the platform's service account read access to your property. Optional: your own GA4 id (GA4_MEASUREMENT_ID, by name).tracking_setup_statusnames what is wired and what is missing.
The weekly assessment (blog-assessment) probes the AI answer engines with your ~30 target queries from your machine (OPENROUTER_API_KEY, optional PERPLEXITY_API_KEY, SERPAPI_KEY — by name, with a cost cap), ingests the results, and writes a report: which queries cite you, mention you, or ignore you; share of voice per engine; the top and striking-distance posts; and proposed topic actions (write, refresh, retire) that go to the Backlog as issues for your approval.
Where results show:
- Hosted tenants — the analytics dashboard on sites.onecontext.me, https://sites.onecontext.me/tenants/
/analytics (period, channel split, AI share, Search Console, AI visibility, top posts). - Artifact and self-publish tenants — the Performance Report issue in your epic, one comment per weekly run, with the same numbers as text.
11 Running it again — existing epic, redo
setup is idempotent — it returns the same skills every time and never creates anything. The existing-epic check is the agent's first step after it: it looks for an epic labelled tenant:<slug> in the Context you connected and for the tenant on the Blog MCP. If a <Brand> Blog epic already exists the agent says so in a few lines (documents, channel parents, open publishes, routines per the last daily brief) and reuses it: it asks only the rounds whose answers are missing or that you want to change, updates documents as new revisions (the decision record keeps the superseded rows), creates only the lanes or issues that are missing, and re-verifies routines instead of re-installing them. Never a second epic, never a second Daily Brief issue. The combined review is raised again only if the map or the documents changed.
Say redo to re-run the whole interview from Round 0 and refresh the brand guides — useful after a rebrand, a new product line, or when the audience changed. Your existing publish issues and their history stay. The agent offers two more: routines — (re)install and verify the schedules on this machine — and continue, which changes nothing and lets the loop run. Naming one thing ("change the cadence", "new voice") is treated as a partial redo of that branch only.
12 Troubleshooting
- No brief today — the routine on your machine is down (host asleep, job unloaded, key expired). Check the job (
launchctl list | grep context,crontab -l, the host's scheduled prompts) and its log (<repo>/.build/routines/daily-brief.log); the loop is fine as soon as a brief is posted. This is the switch working as designed, not a platform outage. - The agent says the epic exists — that is the returning-tenant path (section 10): answer only what it asks, or say
redofor a full re-run. It never creates a second epic. If it does not find your epic, check that you signed into the same Context Account (Google or the iPhone app) as the first time. - Publish refused — the issue is not
doneyet (approve it in Context first), or the issue'sdueis outside the current 3-hour window (the publisher will take it at the slot), or the routine is missingBLOG_ACCESS_KEY(it names the missing key; mint one at sites.onecontext.me/keys and store it under that name). A missed window shows as aMissed windowcomment with the new slot. - Draft bounced repeatedly — read the checker's findings on the issue; the usual causes are a claim without a source, a banned phrase from the brand guide, or a missing original artifact. Fix the brand guide or the topic, not the checker.
- Wrong host for the job — ChatGPT and claude.ai can do everything except Instagram publishing and the AI-visibility probe; the agent says this as a fact in the opening. Use Claude Code or Codex for the full loop.
- Tool not available — the agent says
<tool> is not available yet on this server, attaches the payload it would have sent as a spec on the epic, and continues. Nothing is faked.
Skill sources: https://agents.onecontext.me/skills.